
How to make a stick-bait lure from LEGO
Every year a group of friends and I head to northern Ontario Canada for an annual fishing trip. During this trip we have decided to have a friendly derby. The thing is, there is a very unique catch. The lures used have to be home made. The winner of the years prior derby gets to call the build method. This year it's LEGO. Here is a step by step on how I made mine. I think it's going to be a good one.
If you love upcycling, tinkering, and fishing, turning LEGO into a functional stick-bait lure is a tiny-engineering joy. This guide walks you through creating a durable, castable stick-bait that looks playful on the bench and swims like a champ in the water. It’s approachable for beginners and customizable for anglers who like to experiment.
Materials
- Several LEGO bricks/plates (whatever you want for colors, it's your choice)
- Wire (0.8–1.0 mm / ~20–18 AWG; corrosion-resistant)
- Small split rings and fishing hooks (size depends on target species)
- Epoxy resin (two-part, marine-grade preferred)
- Small beads or BBs (optional, for weight/ratting) — non-lead recommended
- Hobby knife, needle-nose pliers, wire cutters
- Soldering iron with cutting tip
Why add an internal wire?
Embedding a wire “spine” through the LEGO body gives the lure structural integrity, lets you attach split rings cleanly, and protects against breakage if a big fish or snag pulls. The wire also helps align weight and action.
Step-by-step
1. Design the profile
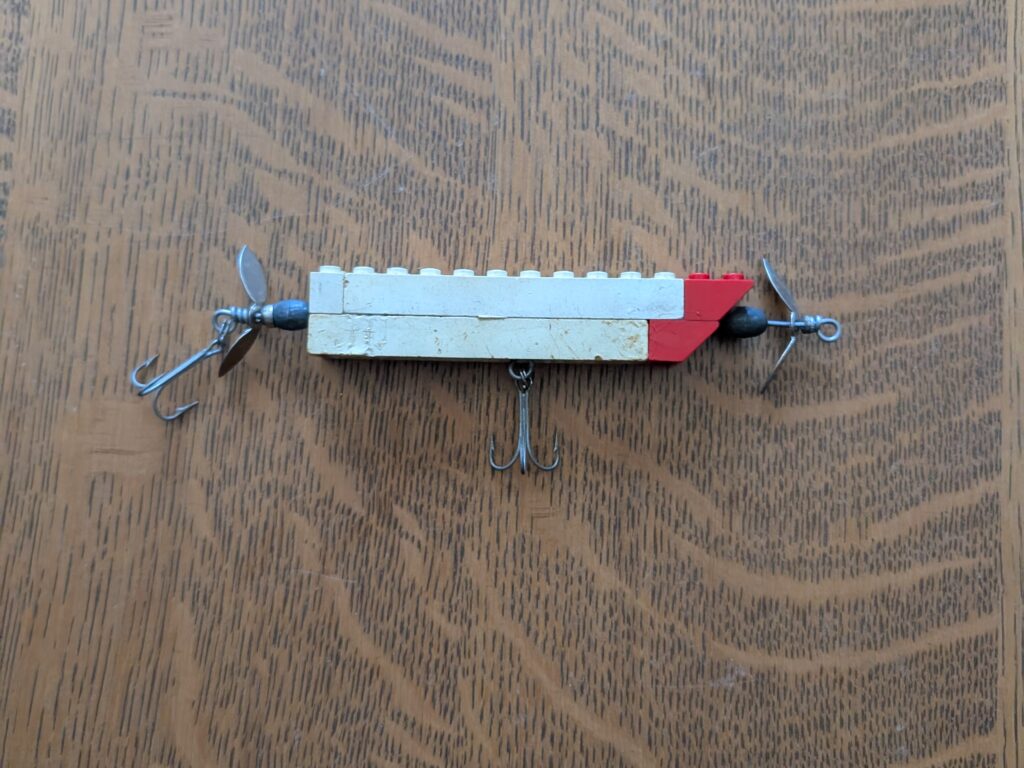
Decide the stick-bait shape — classic tapered stick, slightly curved, or a thin minnow profile. Use LEGO bricks and plates to block out a single solid piece about 2.5–4 inches (6–10 cm) long depending on the species you’re targeting. Keep the top and bottom layers flush so the exterior looks seamless. Fewer seams = easier to seal with epoxy.
2. Prepare the internal channel
Using the soldering iron, melt a shallow channel through the stacked bricks where the wire will sit. You can use a small knife or drill bit for this. The channel should run from the nose all the way to the tail. You will also cut a small hole half way back for a centre treble hook. Make the channel slightly wider than your wire so the epoxy can flow around it later.
3. Cut and shape the wire spine
Measure a length of wire that fits snugly in the channel with about 1/2 inch (10–12 mm} extra at each end for forming attachment loops. Use pliers to bend small, tight loops at both ends — these will accept split rings. If you want extra action, you can join two wire and LEGO sections for a jointed lure. Don't over-bend or weaken the wire.
4. Install optional internal weight/noise
If you want the lure to cast farther or rattle, place a small bead or BB into a hollow you created in the channel, ahead of the wire. Use non-toxic materials (brass or stainless) rather than lead where possible.
5. Epoxy the wire in
Mix two-part epoxy per manufacturer instructions. Apply a thin bead into the channel, insert the wire spine, and push epoxy around it so it bathes the wire and fills gaps. Wipe away excess before it cures. Make sure epoxy doesn’t block the split-ring loops at the ends (you can mask them with tape). Cure fully — overnight is best for strength. Glue all bricks together when finally done designing.
6. Clean up and seal seams
After the epoxy cures, use sandpaper to blend any visible seams or epoxy blobs. If there are gaps between LEGO studs, fill and seal them with thin CA or epoxy glaze for a smooth finish. A smooth body reduces water turbulence and looks more realistic.
7. Add hardware
Attach split rings to the wire loops you formed earlier. Connect hooks and, if desired, a small line-tie split ring at the nose. Use quality split rings and hooks rated for the fish you expect.
8. Finish the lure
Paint or decal the lure as you like. If you paint, use primers that bond to plastic and finish with a clear coat epoxy or polyurethane to protect the artwork. Alternatively, use permanent marker or small adhesive decals for a playful LEGO look — just be sure to seal with a thin clearcoat. You can also just leave the LEGO plain and see what happens.
Testing & tuning
Try the lure in shallow water or a pool first. I use a plastic bin to see how it floats or sinks. A healthy side-to-side wobble or slight rolling tail is ideal for stick baits. If the lure dives too deep, reduce belly weight or file a flatter face. If it spins, check that the wire spine is centered and the hooks/weights are balanced.
In Conclusion
- Experiment: change wire stiffness, internal beads, or paint patterns to match local forage.
- Keep a few spare LEGO pieces and wires on your bench — rapid prototypes are part of the fun.
- This project blends creativity with function: don’t be afraid to iterate.
- Turn a handful of bricks into a conversation-starting lure that catches fish.
- Tight lines and happy building!